Top 6 Best Audio Interfaces For Beginners in 2025
An audio interface is the single most important piece of gear in a home studio. It converts the analog signal from your microphone or instrument into digital audio your computer can record, and it sends audio back out to your headphones or speakers. Without one, you are stuck with your laptop’s built-in mic and headphone jack — neither of which is designed for recording.
If you want to record vocals, guitar, bass, keyboards, or anything else at home, you need an interface. This guide covers the six best options for beginners, what to look for, and how to avoid wasting money on features you do not need yet.
Our Top Picks
| Interface | Best For | Inputs | Price Range | Connection |
|---|---|---|---|---|
| Focusrite Scarlett 2i2 (4th Gen) | Overall best for beginners | 2 | ~$190 | USB-C |
| Audient Evo 4 | Easiest to use | 2 | ~$130 | USB-C |
| Universal Audio Volt 2 | Vintage character | 2 | ~$170 | USB-C |
| MOTU M2 | Best metering and audio quality | 2 | ~$200 | USB-C |
| Behringer UMC202HD | Tightest budget | 2 | ~$70 | USB |
| Solid State Logic SSL2 | Best preamps under $250 | 2 | ~$230 | USB-C |
What an Audio Interface Actually Does
Your computer has a sound card built in, but it is designed for system alerts and video calls — not for recording music. An audio interface replaces that sound card with purpose-built hardware that does three things:
- Converts analog to digital (and back). The preamp boosts your mic or instrument signal, and the ADC (analog-to-digital converter) turns it into data your DAW can record. The DAC (digital-to-analog converter) sends playback audio to your headphones or monitors.
- Provides the right inputs. XLR for microphones (with 48V phantom power for condenser mics), 1/4-inch TRS for line-level gear, and Hi-Z for plugging in a guitar or bass directly.
- Keeps latency low. Dedicated drivers (ASIO on Windows, Core Audio on Mac) let you monitor your playing in near real-time — something your built-in sound card cannot do reliably.
If you are recording into a DAW like GarageBand, REAPER, Logic Pro, Ableton, or FL Studio, the interface is the center of your signal chain.
The 6 Best Beginner Audio Interfaces
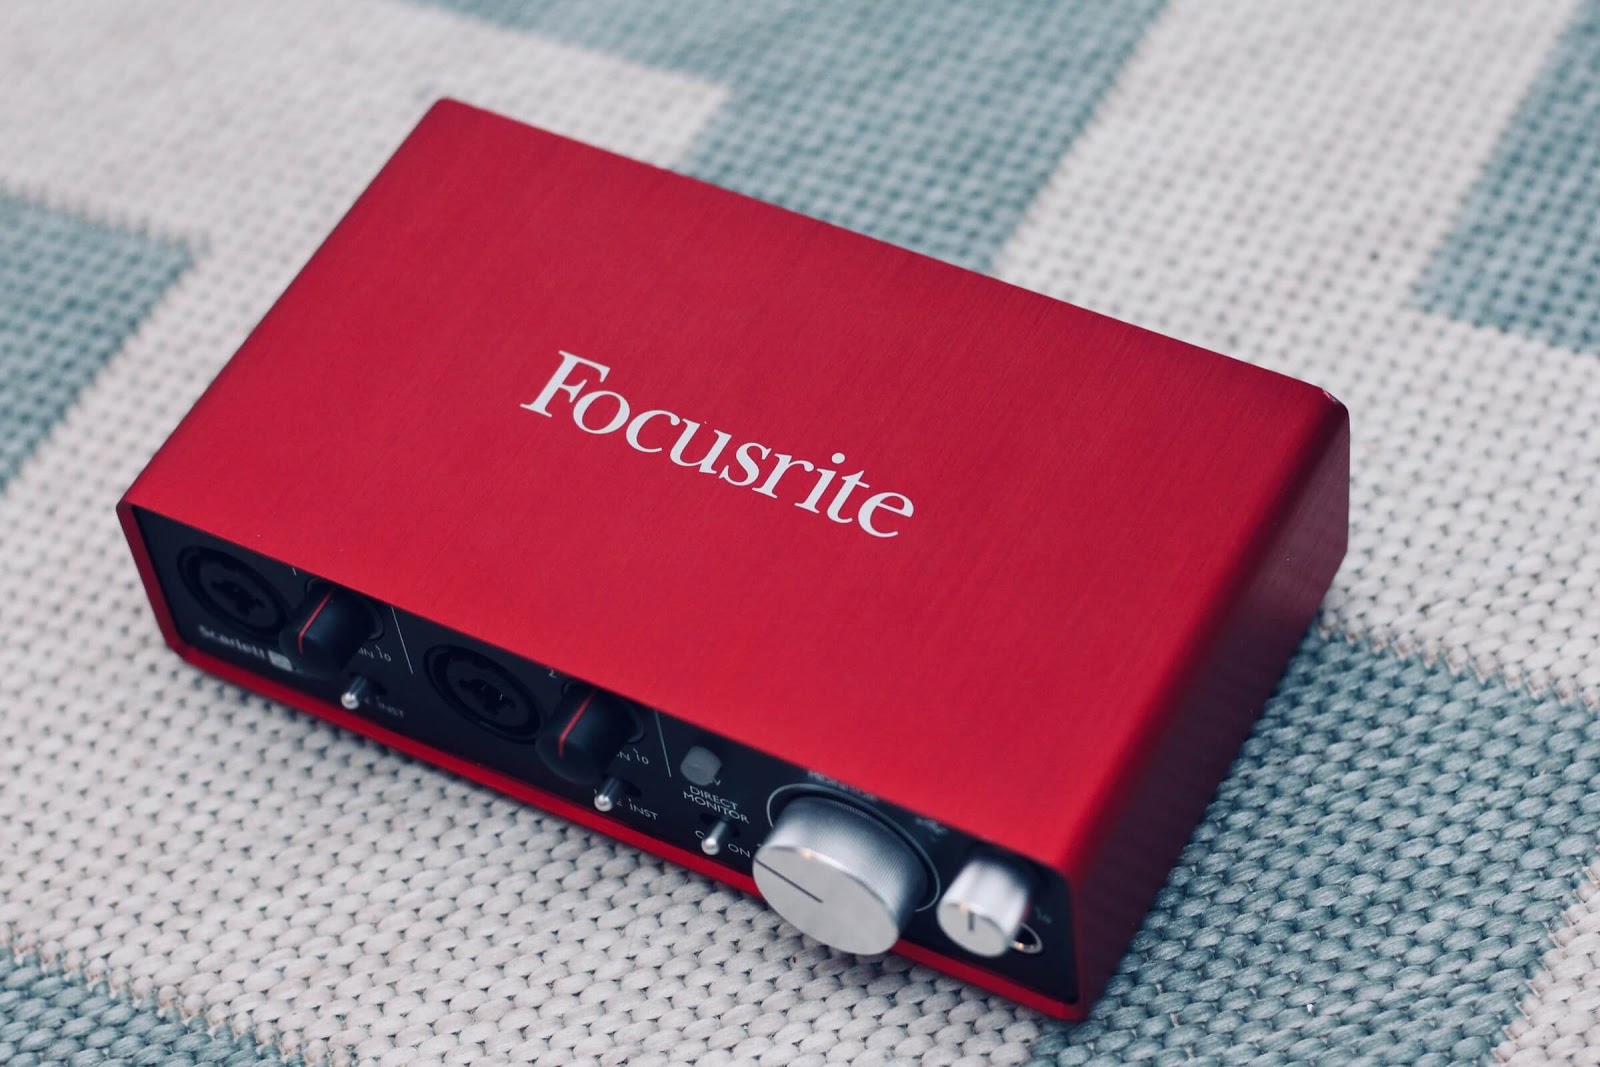
1. Focusrite Scarlett 2i2 (4th Gen) — Best Overall
The Scarlett 2i2 is the world’s best-selling audio interface for good reason. The fourth generation (released in 2023) brings major improvements over the 3rd gen: USB-C connectivity, an Auto Gain feature that sets your levels for you, Clip Safe to prevent digital distortion, and Air mode to add brightness to vocals and acoustic instruments.
What makes it beginner-friendly:
- Auto Gain removes the guesswork of setting input levels — press the button, play or sing, and the interface dials in the right gain
- Clip Safe automatically backs off the gain if your signal gets too hot, so you never ruin a take with digital clipping
- Two combo inputs on the back (XLR/TRS) handle mics, instruments, and line-level sources
- The gain halos around each knob change from green to amber to red, giving you a clear visual of your levels without squinting at tiny meters
- Ships with Ableton Live Lite, a suite of plugins, and three months of Apple Music
Specs: 24-bit/192kHz, 69dB gain range, USB-C (bus-powered), 48V phantom power, headphone output with independent volume.
The 2i2 handles everything a beginner needs and has enough headroom to grow with you. The preamps are clean and quiet, with enough gain for dynamic mics like the Shure SM7B without needing an inline booster. If you only buy one interface, this is the safe choice.
2. Audient Evo 4 — Easiest to Use
If the Scarlett 2i2 is the safe pick, the Evo 4 is the “I just want to plug in and record” pick. Audient stripped away every unnecessary feature and left a dead-simple interface with a single large volume knob, a Smartgain button, and two inputs.
What makes it stand out:
- Smartgain is the best auto-level feature on any budget interface — it listens to your signal for a few seconds and sets the optimal gain, even across multiple inputs simultaneously
- The loopback feature lets you record audio from your computer (useful for podcasters and streamers)
- A single rotary encoder controls everything — less confusion, fewer things to break
- Audient’s preamp design comes from their high-end console heritage
Specs: 24-bit/96kHz, USB-C (bus-powered), 48V phantom power, headphone output.
The trade-off is a lower maximum sample rate (96kHz vs 192kHz). In practice, you will record at 44.1kHz or 48kHz, so this does not matter. The Evo 4 costs less than the Scarlett and is arguably easier to operate right out of the box.
3. Universal Audio Volt 2 — Best for Vintage Tones
Universal Audio built their reputation on high-end studio gear, and the Volt series brings a piece of that DNA to the budget market. The headline feature is the Vintage mode — a hardware circuit modeled after the classic UA 610 tube preamp that adds harmonic warmth and subtle compression to your recordings.
What makes it interesting for beginners:
- The Vintage button gives you an “instant warmth” tone that flatters vocals and acoustic guitar without needing to learn plugins
- Solid build quality with a retro aesthetic
- Ships with UA Spark, a plugin subscription with access to models of classic studio gear
- Two combo inputs with 48V phantom power
Specs: 24-bit/192kHz, USB-C (bus-powered), 48V phantom power, headphone output.
The Volt 2 sits between the Evo 4 and SSL2 in price. If you like the idea of recording with a bit of character baked in — rather than a perfectly clean signal you shape later — it is a compelling choice. Just know that the Vintage effect is printed to your recording and cannot be removed afterward.
4. MOTU M2 — Best Audio Quality and Metering
The MOTU M2 consistently measures among the best-performing interfaces at any price point in independent testing. Its DAC performance rivals units costing three to four times as much, which means your headphone and speaker monitoring will be exceptionally accurate.
What makes it worth considering:
- A full-color LCD meter display shows your input and output levels in real time — far more useful than LED rings
- The loopback feature works cleanly for streaming and podcast recording
- Excellent driver stability on both Mac and Windows
- The headphone amp is powerful enough to drive higher-impedance headphones that choke on cheaper interfaces
Specs: 24-bit/192kHz, USB-C (bus-powered), 48V phantom power, LCD metering, headphone output.
The MOTU M2 costs slightly more than the Scarlett 2i2 but delivers measurably better audio performance. If you care about accuracy — especially for mixing through headphones or studio monitors — it punches well above its price.
5. Behringer UMC202HD — Best for Tight Budgets
If you need an interface and your budget is genuinely limited, the Behringer UMC202HD gets the job done for around $70. It is a no-frills, two-input USB interface with MIDAS-designed preamps that sound surprisingly clean for the price.
What you get:
- Two combo XLR/TRS inputs with individual gain knobs
- 48V phantom power for condenser mics
- Direct monitoring switch for zero-latency monitoring
- A physical on/off switch (more useful than you’d think)
What you give up:
- USB-B connection (not USB-C) — works fine, just needs the right cable
- No auto-gain, no Air mode, no loopback
- The drivers on Windows can occasionally require troubleshooting
- No bundled DAW software
Specs: 24-bit/192kHz, USB (bus-powered), 48V phantom power, headphone output.
The UMC202HD is the interface to buy when you want to start recording now and upgrade later. It does nothing fancy, but the audio quality is honest and the preamps do not add noticeable noise. Pair it with REAPER (a $60 DAW with an unlimited free evaluation period) and you have a functional recording setup for well under $150.
6. Solid State Logic SSL2 — Best Preamps Under $250
SSL (Solid State Logic) makes mixing consoles found in the world’s top recording studios. The SSL2 brings that pedigree to a two-input desktop interface with preamps that have audibly more depth and clarity than anything else at this price.
What sets it apart:
- The preamps are the star — clean, detailed, and with enough gain to handle ribbon mics and quiet sources
- Legacy 4K mode adds the subtle high-frequency sheen of SSL’s classic 4000-series console
- Balanced monitor outputs with a dedicated monitor volume knob
- Ships with SSL’s plugin bundle, including their Native Channel Strip
Specs: 24-bit/192kHz, USB-C (bus-powered), 48V phantom power, balanced monitor outputs, headphone output.
The SSL2 is the most expensive interface on this list, but if you are serious about vocal recording or plan to record acoustic instruments through high-quality condenser mics, the preamp quality will be immediately noticeable. It is also built like a tank — the metal chassis and solid knobs feel professional.
How to Choose: What Actually Matters
With dozens of interfaces on the market, it helps to know which specs matter and which are marketing noise.
Input Count
Most beginners need two inputs. This lets you record a microphone and a guitar at the same time, or two microphones for a podcast or interview. A single input works if you only ever record one source, but two gives you flexibility without added complexity.
If you need more than two simultaneous inputs — for recording drums or a full band live — look at interfaces in the under $500 or under $1,000 range, where four-to-eight-input options become available.
Connection Type
Every interface on this list connects via USB and is bus-powered (no external power supply needed). The practical difference between USB-C and USB-A is just the cable — the audio performance is identical.
If you have a newer MacBook or laptop with only USB-C ports, make sure your interface either ships with a USB-C cable or that you have an adapter. Most current-generation interfaces (Scarlett 4th Gen, Evo 4, Volt 2, MOTU M2, SSL2) ship with USB-C cables.
Thunderbolt interfaces exist (Universal Audio Apollo series) but cost significantly more and are overkill for beginners.
Sample Rate and Bit Depth
Every interface on this list records at 24-bit, which gives you roughly 144dB of dynamic range — far more than you will ever use. This is the standard. Do not buy anything that only records at 16-bit.
Sample rate (44.1kHz, 48kHz, 96kHz, 192kHz) is how many audio snapshots the interface takes per second. Here is the reality: you will record at 44.1kHz or 48kHz. These are the standard rates for music and video respectively. Higher sample rates eat more disk space and CPU power with no audible benefit for home recording. The fact that an interface supports 192kHz is a spec-sheet number, not a practical feature.
Preamp Quality
The preamp amplifies your microphone signal before conversion. A good preamp is clean (low self-noise), has enough gain for quiet microphones, and does not color the sound unless you want it to.
All six interfaces above have preamps that are more than adequate for home recording. The SSL2 and MOTU M2 have the best-measuring preamps in this group, but the differences are subtle. You will get far more improvement from better mic technique and room treatment than from swapping preamps at this level.
Latency and Drivers
Latency is the delay between playing a note and hearing it in your headphones. It is determined by your interface’s drivers, your buffer size setting in your DAW, and your computer’s processing power.
On Mac, all interfaces use Apple’s Core Audio driver, which is universally low-latency. On Windows, you need ASIO drivers — and driver quality varies. Focusrite, Audient, MOTU, and SSL all provide solid ASIO drivers. Behringer works but occasionally requires manual configuration on Windows.
Most interfaces also have a direct monitoring switch or knob that routes your input signal straight to your headphones, bypassing the computer entirely. This gives you zero-latency monitoring and is the practical solution when software monitoring latency is too high.
Phantom Power (48V)
If you plan to use a condenser microphone, you need an interface with 48V phantom power. All six interfaces above include it. Dynamic microphones (like the Shure SM58 or SM7B) do not need phantom power but are not harmed by it.
What You Do Not Need (Yet)
A few features that are marketed heavily but are irrelevant for most beginners:
- MIDI ports. Most MIDI controllers connect via USB now. You only need 5-pin MIDI on your interface if you have vintage hardware synths.
- DSP processing. Some interfaces (Universal Audio Apollo, Antelope) run plugins on built-in processors. This is genuinely useful for professionals tracking with low-latency effects, but it adds significant cost and complexity.
- ADAT/S/PDIF expansion. Digital inputs for adding more preamps later. Useful for growing studios, but not something you need on day one.
- Standalone operation. Running the interface without a computer (as a standalone preamp or headphone amp). Nice to have, not a deciding factor.
Setting Up Your First Interface
Once you have your interface, setup takes about five minutes:
- Install drivers first. Go to the manufacturer’s website and download the latest driver for your operating system. On Mac, most interfaces work without a separate driver install, but the manufacturer’s control software is still worth grabbing.
- Connect via USB. Plug the interface into your computer. Avoid USB hubs — connect directly to a port on your computer for the most reliable connection.
- Set it as your audio device. In your DAW’s preferences (Audio Settings or similar), select the interface as both your input and output device. On Mac, also set it in System Settings > Sound.
- Set your buffer size. Start at 256 samples. If you hear latency while monitoring through software, lower it to 128 or 64. If you hear crackling or dropouts, raise it. This is the main latency-vs-stability trade-off you will manage.
- Connect your mic or instrument. Plug a microphone via XLR into an input, or a guitar/bass via 1/4-inch cable. Turn the gain knob up while playing until the level meter shows a healthy signal (green) without hitting red.
- Monitor through headphones. Plug headphones into the interface’s headphone output. Use the direct monitoring switch for zero-latency monitoring while recording.
The Bottom Line
For most beginners, the Focusrite Scarlett 2i2 (4th Gen) is the right choice. It has the best combination of ease of use, audio quality, software bundle, and community support (which means you can find a YouTube tutorial for literally any problem you run into).
If budget is tight, the Behringer UMC202HD gets you recording for under $100. If you want the simplest possible setup, the Audient Evo 4 is hard to beat. And if you have a bit more to spend and care about audio fidelity, the MOTU M2 or SSL2 will serve you well for years.
The interface you buy today will likely last you three to five years before you feel any urge to upgrade. Spend your remaining budget on a decent microphone, a pair of closed-back headphones, and some basic acoustic treatment — those will make a bigger difference in your recordings than any interface upgrade at this level.